一、准备工作
引入box2d包,在需要使用box2d的文件中加入box2d的头文件;由于box2d是c++编写的,所以要把引入box2d的所有文件后缀名都改为.mm
二、box2d中的一些重要参数
1、gravity,重力加速度,同现实世界中的g,向量
2、shape,形状,形状是有大小的
3、density,密度
4、friction,摩擦力
5、restitution,恢复,此参数用于碰撞,如果两个物体有不同的restitution,box2d总是选择比较大的restitution进行计算
6、meter,距离单位,灵活定义你的meter,当对象为0.1至10meters的时候,box2d可以很好的处理它们,
三、box2d之hello world
让我们先创建一个box2d项目。创建好之后运行:

每当我们点击屏幕时,会落下一个小方块,ok,然我们来详细看下生成的代码。
-(id) init
{
	// always call "super" init
	// Apple recommends to re-assign "self" with the "super" return value
	if( (self=[super init])) {

		// enable touches
		self.isTouchEnabled = YES;

		// enable accelerometer
		self.isAccelerometerEnabled = YES;

		CGSize screenSize = [CCDirector sharedDirector].winSize;
		CCLOG(@"Screen width %0.2f screen height %0.2f",screenSize.width,screenSize.height);

		// Define the gravity vector.
		b2Vec2 gravity;
		gravity.Set(0.0f, -10.0f);

		// Do we want to let bodies sleep?
		// This will speed up the physics simulation
		bool doSleep = true;

		// Construct a world object, which will hold and simulate the rigid bodies.
		world = new b2World(gravity, doSleep);

		world->SetContinuousPhysics(true);

		// Debug Draw functions
		m_debugDraw = new GLESDebugDraw( PTM_RATIO );
		world->SetDebugDraw(m_debugDraw);

		uint32 flags = 0;
		flags += b2DebugDraw::e_shapeBit;
//		flags += b2DebugDraw::e_jointBit;
//		flags += b2DebugDraw::e_aabbBit;
//		flags += b2DebugDraw::e_pairBit;
//		flags += b2DebugDraw::e_centerOfMassBit;
		m_debugDraw->SetFlags(flags);


		// Define the ground body.
		b2BodyDef groundBodyDef;
		groundBodyDef.position.Set(0, 0); // bottom-left corner

		// Call the body factory which allocates memory for the ground body
		// from a pool and creates the ground box shape (also from a pool).
		// The body is also added to the world.
		b2Body* groundBody = world->CreateBody(&groundBodyDef);

		// Define the ground box shape.
		b2PolygonShape groundBox;

		// bottom
		groundBox.SetAsEdge(b2Vec2(0,0), b2Vec2(screenSize.width/PTM_RATIO,0));
		groundBody->CreateFixture(&groundBox,0);

		// top
		groundBox.SetAsEdge(b2Vec2(0,screenSize.height/PTM_RATIO), b2Vec2(screenSize.width/PTM_RATIO,screenSize.height/PTM_RATIO));
		groundBody->CreateFixture(&groundBox,0);

		// left
		groundBox.SetAsEdge(b2Vec2(0,screenSize.height/PTM_RATIO), b2Vec2(0,0));
		groundBody->CreateFixture(&groundBox,0);

		// right
		groundBox.SetAsEdge(b2Vec2(screenSize.width/PTM_RATIO,screenSize.height/PTM_RATIO), b2Vec2(screenSize.width/PTM_RATIO,0));
		groundBody->CreateFixture(&groundBox,0);


		//Set up sprite

		CCSpriteBatchNode *batch = [CCSpriteBatchNode batchNodeWithFile:@"blocks.png" capacity:150];
		[self addChild:batch z:0 tag:kTagBatchNode];

		[self addNewSpriteWithCoords:ccp(screenSize.width/2, screenSize.height/2)];

		CCLabelTTF *label = [CCLabelTTF labelWithString:@"Tap screen" fontName:@"Marker Felt" fontSize:32];
		[self addChild:label z:0];
		[label setColor:ccc3(0,0,255)];
		label.position = ccp( screenSize.width/2, screenSize.height-50);

		[self schedule: @selector(tick:)];
	}
	return self;
}
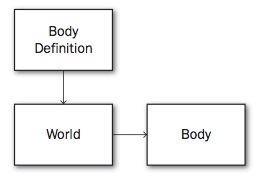
init方法首先创建了重力加速度,加速度是一个向量,-10是因为加速度朝向y轴负方向。之后创建world以及word的四个边缘,防止物体跑出屏幕。再然后是创建精灵(这里用到了之前一篇博客的创建精灵方法,如果有疑问,传送门:http://blog.csdn.net/volcan1987/article/details/7727593)和一个label,然后schedule tick方法
创建body的步骤
创建fixture步骤
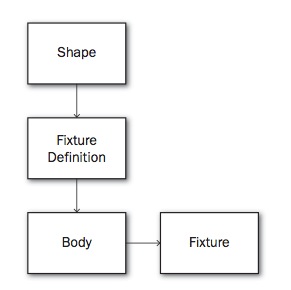
知道了这些,让我们来看看如何创建一个box2d世界中的物体
-(void) addNewSpriteWithCoords:(CGPoint)p
{
	CCLOG(@"Add sprite %0.2f x %02.f",p.x,p.y);
	CCSpriteBatchNode *batch = (CCSpriteBatchNode*) [self getChildByTag:kTagBatchNode];

	//We have a 64x64 sprite sheet with 4 different 32x32 images.  The following code is
	//just randomly picking one of the images
	int idx = (CCRANDOM_0_1() > .5 ? 0:1);
	int idy = (CCRANDOM_0_1() > .5 ? 0:1);
	CCSprite *sprite = [CCSprite spriteWithBatchNode:batch rect:CGRectMake(32 * idx,32 * idy,32,32)];
	[batch addChild:sprite];

	sprite.position = ccp( p.x, p.y);

	// Define the dynamic body.
	//Set up a 1m squared box in the physics world
	b2BodyDef bodyDef;
	bodyDef.type = b2_dynamicBody;

	bodyDef.position.Set(p.x/PTM_RATIO, p.y/PTM_RATIO);
	bodyDef.userData = sprite;
	b2Body *body = world->CreateBody(&bodyDef);

	// Define another box shape for our dynamic body.
	b2PolygonShape dynamicBox;
	dynamicBox.SetAsBox(.5f, .5f);//These are mid points for our 1m box

	// Define the dynamic body fixture.
	b2FixtureDef fixtureDef;
	fixtureDef.shape = &dynamicBox;
	fixtureDef.density = 1.0f;
	fixtureDef.friction = 0.3f;
	body->CreateFixture(&fixtureDef);
}
可以看到,代码中的步骤跟我们上面的步骤一样,唯一不同的就是多了一个userData,这个属性用来绑定精灵否则你会看到精灵在你点击的地方不动,而一个粉色的方块掉了下去。fixture是相对于body的位置来的
下面这段代码相对固定,可以先不管
-(void) draw
{
	// Default GL states: GL_TEXTURE_2D, GL_VERTEX_ARRAY, GL_COLOR_ARRAY, GL_TEXTURE_COORD_ARRAY
	// Needed states:  GL_VERTEX_ARRAY,
	// Unneeded states: GL_TEXTURE_2D, GL_COLOR_ARRAY, GL_TEXTURE_COORD_ARRAY
	glDisable(GL_TEXTURE_2D);
	glDisableClientState(GL_COLOR_ARRAY);
	glDisableClientState(GL_TEXTURE_COORD_ARRAY);

	world->DrawDebugData();

	// restore default GL states
	glEnable(GL_TEXTURE_2D);
	glEnableClientState(GL_COLOR_ARRAY);
	glEnableClientState(GL_TEXTURE_COORD_ARRAY);

}
接下来是tick方法
-(void) tick: (ccTime) dt
{
	//It is recommended that a fixed time step is used with Box2D for stability
	//of the simulation, however, we are using a variable time step here.
	//You need to make an informed choice, the following URL is useful
	//http://gafferongames.com/game-physics/fix-your-timestep/

	int32 velocityIterations = 8;
	int32 positionIterations = 1;

	// Instruct the world to perform a single step of simulation. It is
	// generally best to keep the time step and iterations fixed.
	world->Step(dt, velocityIterations, positionIterations);


	//Iterate over the bodies in the physics world
	for (b2Body* b = world->GetBodyList(); b; b = b->GetNext())
	{
		if (b->GetUserData() != NULL) {
			//Synchronize the AtlasSprites position and rotation with the corresponding body
			CCSprite *myActor = (CCSprite*)b->GetUserData();
			myActor.position = CGPointMake( b->GetPosition().x * PTM_RATIO, b->GetPosition().y * PTM_RATIO);
			myActor.rotation = -1 * CC_RADIANS_TO_DEGREES(b->GetAngle());
		}
	}
}
先说下step方法,velocityIterations和positionIterations这两个参数越大,box2d就能进行更好的模拟,但是性能就会下降,这两个参数你应该自己把握以适合你的游戏。
下面的循环是为了让你的sprite与box2d中的对象同步,你可以注释掉这段代码看下效果,你会发现粉方块掉下去了,你的sprite没掉下去。
ok,今天先这么多,没想到想着挺简单,却写了这么久,有时间继续!
分享到:


相关推荐
在cocos2d里面如何使用物理引擎box2d:弹球
这是cocos2d中物理引擎Cocos2d的实例,实例分为两个,有2.x和3.x
最简单的helloworld实例上添加物理引擎cocos2d-x box2d 物理引擎
cocos2d 学习笔记
使用cocos code ide,基于cocos2d-js中的物理引擎chipmunk制作的一个demo,简单的陈述了从引力场创建,到刚体创建,刚体下落和碰撞的过程。Demo简单,容易上手。
由于物理引擎的使用发生了很大的变化,这是我在cocos2d-x 3.1 引擎下,最新调试出,可以用的物理引擎。大家可以尝试下。由于耗费了很多时间才调试好。积分多点见谅。
瘸腿蛤蟆笔记42-cocos2d-x-3.2 Box2d物理引擎Motor Joint
【吼吼睡cocos2d学习笔记】第七章 - 4个很酷的类 代码
自己记录的Cocos2d-x学习笔记,希望能够帮助新手,快速入门,掌握cocos2d-x的开发
瘸腿蛤蟆笔记39-cocos2d-x-3.2 Box2d物理引擎自由落体代码
资源名称:Cocos2d-x实战:JS卷——Cocos2d-JS开发内容简介:本书是介绍Cocos2d-x游戏编程和开发技术书籍,介绍了使用Cocos2d-JS中核心类、瓦片地图、物理引擎、音乐音效、数据持久化、网络通信、性能优化、多平台...
资源名称:大富翁手机游戏开发实战基于Cocos2d-x3.2引擎内容简介:李德国编著的《大富翁手机游戏开发实战(基于 Cocos2d-x3.2引擎)》使用Cocos2d-x游戏引擎技术,带领读者一步一步从零开始进行大富翁移动游戏的开发...
瘸腿蛤蟆笔记40-cocos2d-x-3.2 Box2d物理引擎实现作用力
瘸腿蛤蟆笔记38-cocos2d-x-3.2 Box2d物理引擎Ray-cast代码
cocos2d的学习资料,一本比较经典的cocos2d开发书,适合cocos2d/cocos2d-x的入门
软体物理引擎JellyPhysics ios下的移植 感谢物理引擎的作者walaber 该物理引擎应该是类似jellycar或者rockrock游戏的物理基础 显示使用cocos2d游戏引擎 opengl es 1.0渲染环境 实现 c++到oc的封装 图形渲染 ...
Cocos2D-X2.2.3学习笔记3(内存管理) http://blog.csdn.net/hucblog/article/category/2242181
cocos2d入门 cocos2d入门 cocos2d入门 cocos2d入门 cocos2d入门 cocos2d入门
我在mac下实现并压缩打包的,可能在windows下会出现问题...
xtzf2 ios cocos2d box2d touch 带粒子效果的火球 基于原生的cocos2d box2d模板做的一个小例子 使用粒子系统 通过move或touch事件来控制火球的坠落